 Tile Studio II
In the old days, graphics artists had to work with lots of limitations (limited color depth, maximum number of colors on the screen at the same time, memory sizes, resolution), but still were able to make amazing looking pixel art games.
You could save a lot of memory by splitting up graphics into little tiles and reusing those with different color palettes. This results in far less work than drawing a complete level in pixels and usually results in more consistency in the graphics overall.
Tile Studio II aims to help you produce high quality pixel art graphics, but without the kinds of limitations that the early artists faced. It lets you make little tiles which can be used in different colors and combine those into a tilesheet, with which you can draw your maps.
Palettes
Tile Studio II works with indexed graphics. Whenever you draw a pixel, you don’t actually draw an absolute color value, but a pointer to a position in a color palette. If you would later change the palette at that position, the color in your drawing will change too.

Tile Studio II works with gradients so you don’t need to define each color individually. You can define a gradient with just one color, like the grey below. Only the center color was defined as 128, 128, 128 (red, green, blue), and the delta (difference to each next color) as 28, 28, 28, which produces a smooth gradient from black to white.
 The second gradient (green) is also defined by just one color, but the delta has different values for red, green and blue to make the lighter part more yellowish.
As you can see in the third gradient, you can place lots of different colors and the gradient will make a smooth transition to them. You can also place two different colors next to each other, like in the forth gradient.

A palette index can also be between two colors in your palette. As you can see here, when you select a range of colors, you get a smoother gradient of that range with more intermediate colors to choose from (however, if you do want to limit yourself to the colors in your palette, you can do so in the tile designer by setting precision to 1).
More information: Palette Editor
Bitmaps and the Pixel Editor
Tile Studio II works differently than most tile / map editors. There are actually two layers of tiles. Instead of using tiles from your bitmap to draw to the map, you use them to construct your actual tilesheet. This way you end up having to draw less pixels and can reuse the same drawings several times in your tilesheet.
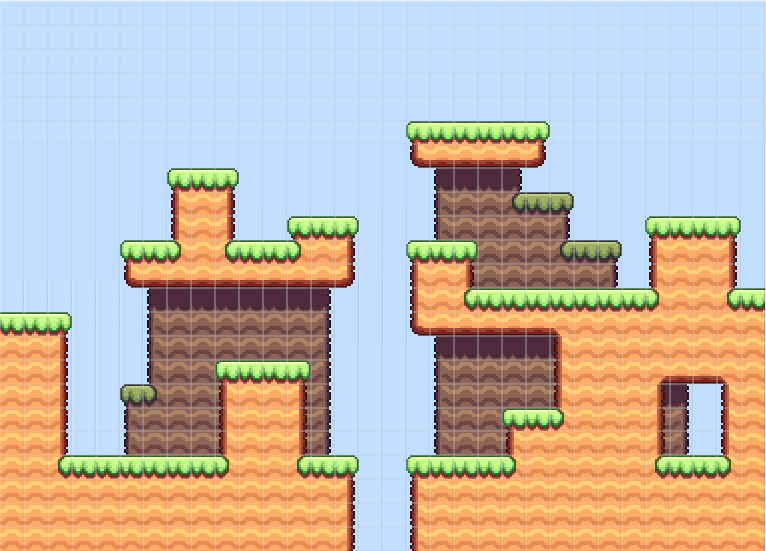
Here is an example of a bitmap (the pixels you draw), a tilesheet (created from the bitmap) and a map (using tiles from the tilesheet):


The bitmap you use is generally very small. You can edit it with the pixel editor. You can make a selection of tiles to edit simultaneously, like 3 x 2 tiles in this example:

Tile Studio II has the option Only One Gradient per Tile in the Tile menu. If checked, whenever you choose a color from the palette, the drawing in the bitmap editor will be remapped to the gradient you are using. It’s good practice to only use one gradient in each tile. You can combine them later in layers in your tilesheet and then you can change the colors for each layer.
There is a pattern viewer to let you see the a repeated version of the tile (or area) you are drawing so that you can easily make your tiles seamless:

You can set up areas in your bitmap for animations. This allows you to easily cycle through the frames using the keyboard so that you can see how the animation will look.

More information: Bitmaps and Pixel Editor
Tilesheets and the Tile Designer
In the tilesheet you can design your tiles that you will be using to draw in your maps. You can construct each tile from blocks you draw in your bitmap. You can combine them in layers and use lots of parameters to modify them.

Using the designer may take some time to get used to. You could look at the designer as the editor for the current selection of the tilesheet. See the example below (using the selection in the tilesheet above):

The designer has two rows, at the top you see the layers of the selected tile from bottom to top (In this example the second layer is used as alpha multiplier so the black area is erased). In the bottom row you see (from left to right):
- the selection in the bitmap (can be multiple tiles with one selected)
- the active tile, transformed and recolored (this is where you set all the properties)
- the active tile (all layers)
- the selection in the tilesheet (can be multiple tiles with one selected)
For the active tile you can set properties in the Properties window.

In the Indie and Pro version there are even more properties here and you can also use scripting.
More information: Tilesheets and Tile Designer
Maps
Once you have a tilesheet, you can start making maps with it. You can select a tile and draw with it. But you can also make a selection of tiles in the tilesheet and place that into the map at once.
You can make a selection in the map as well and then you can fill it with one or more tiles. If you have an area selected in your tilesheet, you can do a stretch fill, which will keep the edge tiles at the edges with selections of any size.

When you make a selection in the map, there are several things you can do, like flip and move tiles, see the Map menu.
More information: Maps
Map Layers


Tile Studio II supports multiple layers. However, these are not meant as background layers (like parallax scrolling layers, those should have their own map). These layers always have the same size and can be merged together when you export your map, but you can also keep them separate (which is specified with the MergeGroup property, layers with the same MergeGroup will be merged together).
More information: Layers
Map Objects
You can place objects in your maps. In the example below we have two object types, coins and ground. For the coins we enable the property MultipleObjectsInsteadOfArea so if we draw an area of coins, these will be stored seperately, instead of one big one. For the ground we just fill the area up with rectangles.

You can specify a name and a color for each type of object. You can either export objects per cell from your map (you may want to store a map of the coins) or export your objects as a list (you might need to have a list of ground areas to put into a physics engine).
More information: Map Objects
Scripting
There are two kinds of scripts that you can use in Tile Studio II, scripts to modify the tile buffer and export scripts.
When running scripts, it is good to enable the console window from the View menu. There could be warnings or error messages if your script doesn’t work properly.
You can setup scripts to run whenever you press a certain function key. Here is an example of a simple function that adds a dither effect to any tile:

The first line sets up the F4 shortcut key to run the function DitherEffect, which is then defined by using the built-in function ModifyBuffer, which executes a given function f on every pixel in the buffer. In the function f, we add 1 to the color offset if (x + y) results in an od number (bp is the BufferPixel, it contains Gradient, Offset and Alpha, which can be modified in this function).
Once Tile Studio II has recognized your function, it will be available in the script menu:

Now, here is what happens when we press F4 for this example tile:


Export functions work in the same way, you can set up a function key to export your project. Using LUA code, you can specify how you want your graphics and maps to be exported. Or (in the future) you can look for an export function that targets the library / system that you are using.
More information: Scripting
Configurations
A project can have different export configurations. For example, you could have one for desktop and one for mobile. You can choose the active configuration before exporting your project.

In your export code, you can do things differently depending on the selected target. Besides, there are some default settings in the configuration, like the maximum texture size.
See the Learn section for more information.